- Hakio
- October 27, 2019
- Updated November 14, 2023
- Tips , Mobile games on PC
You just installed BlueStacks and you want to know how to optimize your Android emulator? To get the best possible performance, follow the guide!
In this article, I will show you all the points you can improve. I explain how to configure the emulator to increase its performance and play with better graphics!
If you haven't installed BlueStacks yet, you can download BlueStacks here 🙂.
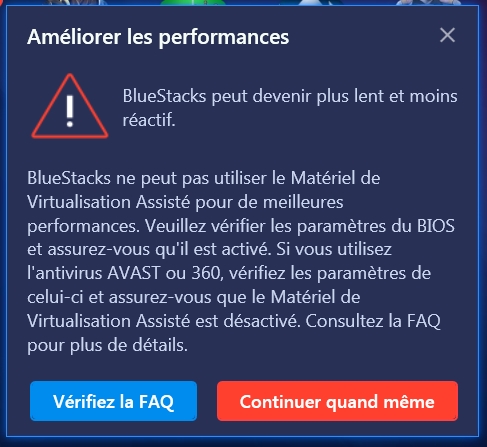
Enabling assisted virtualization is the most important thing you can do to optimize BlueStacks and get better performance. You should get a warning message if it is not enabled on your PC:
Before going any further, check that your processor allows it with these 2 tools:
If your processor supports virtualisation, then you can boost the performance of your emulator ! To do this, you need to restart your computer and access your BIOS at startup:
This may vary between PC models and brands, but common keys are : F2, escape or del.
Once you are in the BIOS, you need to enable virtualisation. Here is an example for an Asus BIOS:
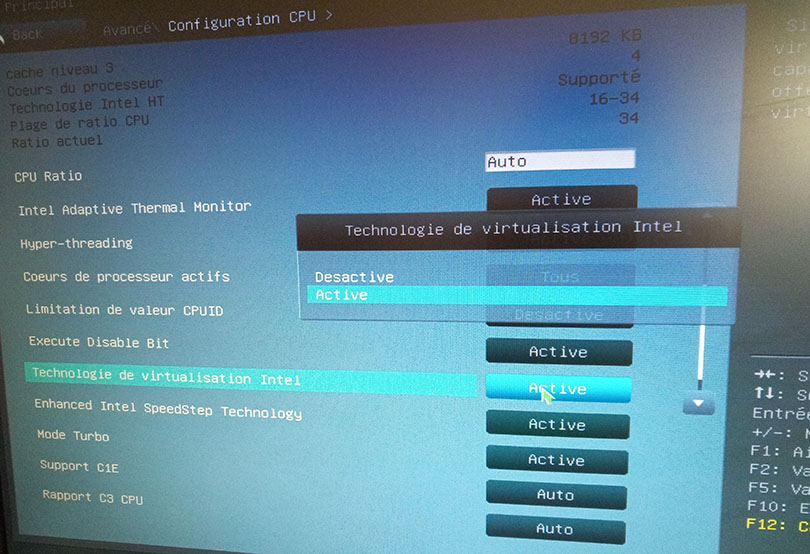
Note that you will probably not have this layout for your BIOS but the principle remains the same. Once you have enabled virtualisation, simplysave your changes and reboot your PC.
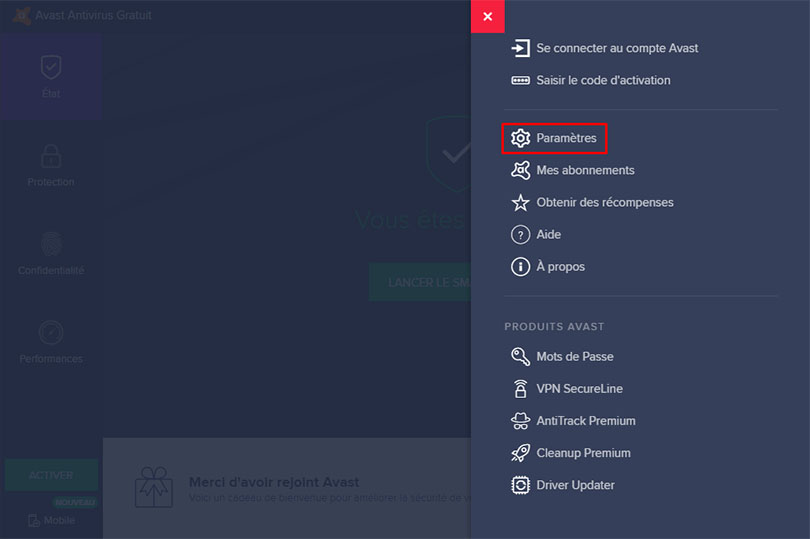
In some cases, your antivirus software can degrade the performance of your virtualization. The antivirus that causes the most problems for the BlueStacks emulator is Avast Antivirus because of one of its settings.
To disable this setting and optimize BlueStacks, go to the avast Menu (top right) and then to Avast Settings :
Then, in General > Troubleshooting, uncheck "Enable hardware support for virtualisation".
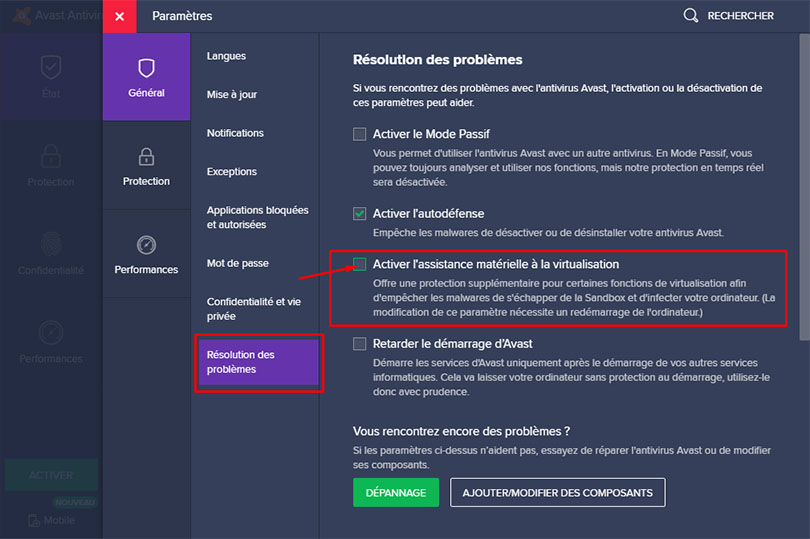
There you go, you should have no more problems between Avast and BlueStacks!
If you are a fan of virtualisation software such as VirtualBox, Hyper-V or VMWare, you may experience conflicts and performance losses.
To fix this, simply disable other virtualization software in the Windows settings:
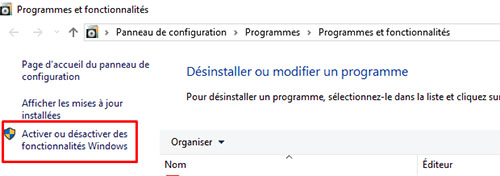
Next, simply uncheck the software you are using. For the Windows virtualisation service, uncheck Hyper-V, Virtual Machine Platform and Windows Hypervisor Platform (only 1 or 2 of the above settings will be present depending on your Windows version).
Manufacturers usually put your computers on a "Normal Use" or "Power Save" power supply. To increase the performance of BlueStacks, you can switch your power supply to "High Performance".
To do this, go to your power settings and check the box below:

A quick tip to access these settings is to click on the Windows key + R and then enter powercfg.cpl.
If you have a PC that is not powerful enough, this can cause problems for BlueStacks. To fix this, you can upgrade your PC by changing the CPU or adding more RAM for example.
I invite you to respect at least the system requirements of BlueStacks for your emulator to work properly.
Personally, I advise you to have at least 8GB of RAM and toallocate at least 4GB of RAM to BlueStacks. Of course, I also advise you to keep your system and drivers up to date!
And that's where this article ends. I hope I've helped you with this BlueStacks performance optimization and that you're now ready to play in the best possible conditions! 😄
If you really can't get BlueStacks to work properly, I invite you to try another one by choosing from our top of the best Android emulators for PC.
Check out our other tips on mobile games 😉
For Bluestacks 4 to work properly, the minimum system requirements are as follows:
Here are the recommended settings for BlueStacks 4 to work in optimal conditions:
Enabling assisted virtualisation is the most important thing to do. Reboot your computer. When booting up, access your BIOS using F2, escape or del (this varies between models and brands). Once you are in the BIOS, enable virtualization. Save your changes and reboot your PC.
Totally! That's why we use the BlueStacks emulator every day for our tests. This emulator is completely secure, reliable and licensed, of course. It's completely legal to use an emulator. This software is used to simulate an Android environment on your computer. In short, it's like being on your smartphone, but on a big screen!


In this guide, we'll detail how to download and play Harry Potter: Magic Awakened on PC. Two methods are possible: via the official Portkey Games...

Pirates of the Caribbean: ToW is available on Android and iOS, but you can also play it on PC or Mac via the browser version (official) or via an...

We will explain how to play Dragon Ball Z Dokkan Battle on PC. The advantages are numerous: improved game comfort, battery that does not overheat...

Want to play Switch games on mobile? It wasn't possible until now. Good news, though, as Skyline, the first Nintendo Switch emulator on mobile, i...

If you are interested in knowing how to download June's Journey on PC, then you are in the right place! We will guide you step by step so that yo...

In this tip, we will see how to download Gacha Club to your PC or Mac. The procedure will allow you to play your favourite application as well as...


Leave a comment
Your email address will not be published. Required fields are marked with*.